 We
delivered a virtual machine named “Nimbus” to allow
developers and enthusiasts to compile and customize the software with
minimal efforts and without particular knowledge of programming.
We
delivered a virtual machine named “Nimbus” to allow
developers and enthusiasts to compile and customize the software with
minimal efforts and without particular knowledge of programming.
LK8000 version 6.0
What's new and what has changed since v5.0
© 2016 The LK8000 Development Team
September 2016
The entire code base has been revised to adopt a common cross-platform set of functions and libraries, and it now compiles and run natively on Linux architectures aside Windows, thanks to Bruno de Lacheisserie. We have now LK for native Linux, Kobo, Apple iOS, Raspberry PI, and more coming!
We
delivered a virtual machine named “Nimbus” to allow
developers and enthusiasts to compile and customize the software with
minimal efforts and without particular knowledge of programming.
Nimbus was delivered in January 2015, as a priority step for team development.
While focusing on adapting the code for new operating systems, we also strove to keep efficiency and reliability inherited from version 5.0. As a result, the new 6.0 is even faster than any previous version, and it can still run on slow CPU hardware: it is perfectly usable on 360Mhz RISC processors and it could be installed on ancient early PPC 2002 pocket computers, if we had one to test on!
Since new hardware can be delivered with several screen resolutions, we had to support all kind of geometries; for this reason a considerable amount of time has been spent to make LK shine on any resolution, and any orientation. In the past, “portrait” mode was considered a second choice, after landscape, but now they are both equally good.
It is now possible to choose font sizes for most items of the user interface, and LK will automatically adapt the look and feel without the need to restart; results are instantly visible.
A much desired feature we accomplished was to let people be able to change the overlays .
Functionally, there are several precious improvements and many small bug fixes.
A final word about the Linux version for Kobo e-readers: we found some compromises changing original colors to dithered grey-scale colors, in order to make it better – if possible. The lack of colors is quite compensated by a perfect readability under the sun light of e-ink screens, and many paragliding pilots have been using earlier alpha versions of LK since many months with satisfaction.
Happy flights, and safe landings
The LK8000 Development Team
We
all know too well how complicated it is to install a development
platform to be able to "compile" (generate executable
machine code) something. As developers, we had some bad times in the
past helping people to join us on the source code, not to mention the
fact that we were all testing on different environments.
While
migrating to linux, as a first step towards other operating systems,
we felt it was time to settle and solve this problem once and
forever.
We want that anybody, even non-techies people, can
compile its own version of LK, and change it if they want to do it.
Or at least, they can try on that too!
We want that new
developers can jump on the project without the hassle of installing
tons of things and packages, and be ready to go in less than 30
minutes, most of them spent on a simple single download of a
file.
We wanted a friendly environment, exactly the same for
all of us, consolidated and easy to maintain.
The only
possible approach to fullfill all of this is to provide to everybody
a computer, preinstalled, with nothing else to do but run it and find
everything in it ready to be used.
Of course, we cannot ship a
real computer. We ship a virtual machine instead. This is "nimbus".
Nimbus
is a debian
7
linux
virtual machine,
preinstalled and preconfigured, running under VmWare player (free of
charge).
It is 1.8G file, 7z format, uncompressed is about 8G.
It
uncompress in one folder, and you simply open that folder in vmware
player. Nimbus is ready to be run.
There is a quick lkmenu to
make things easier that automatically appears on startup.
We have
notes and instructions inside.
We have DropBox shared
filesystem: what you copy in /lk/DropBox appears automatically on
other nimbus.
To send a file, or to distribute an NMEA log, it is
just as simple as copying it there. (This feature is reserved to
active official developers).
We have wine and LK installed,
running PC version perfectly. COM1,2,3,4 are available and a gps
simulator and NMEA replicator that can feed LK with nmea logs.
It
is really an amazing approach to development, also exceptional for
new people. Just consider that to compile LK , after login, you
simply have to:
cd
/lk/github/LK8000
make TARGET=PNA
mv LK8000-PNA.exe /shared
That's
right, after login only 3 commands are needed, to expose a new
compiled version inside your windows machine. Your own LK!
There
is also an embedded chat system inside, to talk to other developers.
And all of this can fit on a USB pen drive with at least 8G of space,
if you want to "bring the development system" with you
around, and run it on different computers.
It does not need
much computing power, and it can be run also inside another linux
machine: it is a virtual environment, running in only 256 M (mega) of
ram (best with 512M).
Nimbus can compile LK for all platforms under developments: PC, PNA, PPC2002, PPC2003, native LINUX and ARM LINUX - KOBO.
You
can download Nimbus as a 7z file from
http://www.tinyurl.com/LK8000-NIMBUS
You need also Vmware Player
or Workstation (www.vmware.com) .
Watchout, the download takes some time since you are going to fetch 1.8 gigabytes at once.
You can join the development community on Whatsapp, get in touch with us for details.
Overlays for gliders have gained a new field, previously available only during thermal mode. For paragliding this field was already enabled. By default it is showing ground speed. In LK 6.0 all overlays can be customized! Enter system configuration, and go to menu 13.

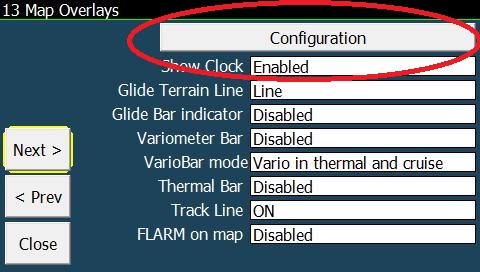


Overlays Top (Left,Center,Right) cannot be changed, only enabled or disabled. Overlays Right Top can be enabled, disabled, or changed to AUX 1. Right center can be changed also to AUX 2, and so on till Left Corner, AUX7. These AUX values are the same used by the AUX bottombar, and they are configurable in menu 19. In the example we change Left bottom to AUX6, and configure AUX6 to be Time Local.
 Since
we can enable-disable each overlay, there is no more a configurable
option for “Full overlays” or “Half overlays”
like we had until v5.
Since
we can enable-disable each overlay, there is no more a configurable
option for “Full overlays” or “Half overlays”
like we had until v5.
And we also do not have anymore the “Font size” configuration for overlays in page 13: previously they could be only big font or small font. Now we can do much better!
Please notice that we still have “show clock”, because if you set it off it will be replaced by the distance (33.3km in the example). Top Right can be a clock or the distance, depending on that choice, as before.
If you disable the Left Bottom overlay, then Left top and Left Center will dispose themselves with better spacing for optimal readability.


The beauty of LK v6 is that you can change font sizes without any trouble, with instant results and no need to restart the software. LK will dynamically reposition all overlays for the the best look.
Fonts are changed using a scale from -10 to +10, with 0 being the default , in system configuration menu 12.


Overlay target will change both Top overlays AND the wind overlay, named Left Corner.
Overlay values are the values of course; notice that the safety indicators are not affected by changes, since their size is calculated automatically for safety reasons, hence their name!
Depending on how far you position the device from your eyes, you may need bigger or smaller fonts.
LK will do its best to try and reposition all items without overlapping, but of course you cannot double the size of all overlays if they cannot fit in the screen. No miracles.
A different matter is for Map waypoints and topology items: they are automatically printed leaving space for each other without overlapping, and if you reduce size you will also see more items on screen. The “decluttering engine” in system menu 3 map display will do the rest.
In menu 12 you can change the size of bottom bar fonts.


If you reduce size, there is some space available and LK will try to use it, adding more items.
If you enlarge font size, there is less space and some items will be removed.


They all fit perfectly in any case!
Like for the bottom bar, also VisualGlide will make use of available space if you reduce font size.


The “nearest” as we all know are the list of waypoints in 2.1 2.2 3.1 etc.
They also apply to airspaces list page 2.4 of course.


 By
selecting “Info on two lines” ON, you will get a more
usable list of items, and a much bigger area to click on with your
finger. Fonts are automatically bigger with two lines, and you can
experiment also reducing font size while using two lines.
By
selecting “Info on two lines” ON, you will get a more
usable list of items, and a much bigger area to click on with your
finger. Fonts are automatically bigger with two lines, and you can
experiment also reducing font size while using two lines.

FLARM buttons for TRACKING option in Config 2/3 FLARM setup Stealth modes
"Credits" (Info 2/3 > Credits)
Radio control support driver for KRT2 (Config1/3 -> Radio)
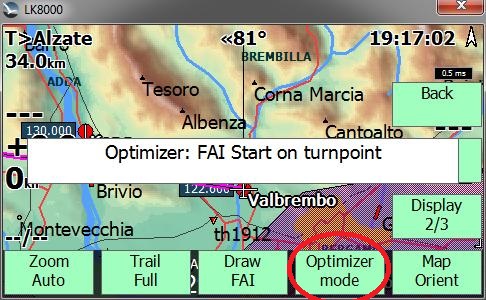
The FAI optimizer drawing sectors can now “on the fly” show optimization for start on either turnpoints or middle leg. It would be very confusing to see both at the same time.
Button in Display 2/3 will switch choice, and also in Analysis page.

Airspeed accuracy for Glider polar is now 0.5m/s instead of previous 1m/s
Improved accuracy of Speed to Fly calculation
Supporting RMZ airspace zone Radio Mandatory Zone
AG airspace token type is ignored
Alternate1 and Alternate2 distances in nautical miles.
In v6 the autozoom is calculated using "optimized turnpoint" (or AAT Target point) instead of center.
Improved FAI sectors (open second sector in 25/45% threshold transition)
New Conical ESS turnpoint type for PG optimized task
Best speed / climb rate for reach this turnpoint is displayed inside analysis / glide-polar screen.
Cone slope is draw on next turnpoint "side view".
AutoMC and Speed to fly take account of Conical ESS in Final Glide.
Default "Base Altitude" for this turnpoint is the Altitude of turnpoint.
Required speed for reach start on Time Gate Overlay,
"---" is displayed when speed is to slow, "oo" when speed is too fast
New generic radio control driver PVCOM (NMEA splitter via Arduino in progress)
New driver for LXNAV Nano 3, including task declaration
New XCTRACER driver
New GPSbip driver
New Flymaster GPS driver
NMEA checksum previously configurable in Com port setup is now part of engineering menu, and by default it is enabled. It is a very bad idea to disable NMEA checksum while using a real RS232 serial line, which is not granting data integrity during transmission.
New netto vario parameter in integrated simulator.
In device configuration it is now possible to monitor port activity in real time.


You can select anytime the desired Device A or B, and while monitoring you can suspend the data stream flow by pressing Stop. The Stop button will change to Resume. The monitor window is auto-scrolling and will report the total of received and transmitted data bytes, also accounting for errors.
Two new terrain color schemes are available in system configuration page 6.
LiteAlps gives best results rendering terrain making valleys and flatlands appearing in contrast to hills and mountains around and using bright color as much as possible.

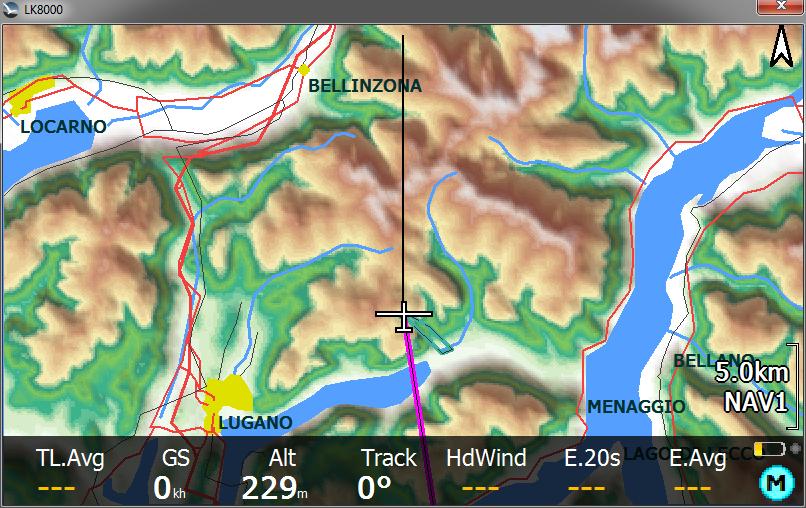
The “Low Hills” scheme is dedicated to low lands with a lot of low hills, averaging around 600-700m.
This is perfect for the UK, but can also work beautifully in other countries.

In the two screenshots of the same terrain, on the left LiteAlps, on the right Low Hills.


LK v5 was saving automatically all parameters changed in menus during runtime.
This is now optional, and by default disabled.
You can enable this option in system configuration, menu 22.
You can now choose which resolution LK should use (for example 960x572) by creating a link adding following parameters to command line:
C:\Users\yourname\Desktop\LK8000-PC.exe -x=960 -y=572
Values allowed are 240 to 4000 (pixels).
Currently squared screens (like 400x400, 600x600) are not supported by LK.
The plugin extension for FAI-CIVL is no more needed and it is not used any more.
So there are no more plugins for LK v6.
Battery information is updated every 2 seconds, no more every second, to minimize variations.
New icon, resized for better layout on all screen resolutions
If Team Mate is in use, then the team mate code of a waypoint will be printed aside the name while examining wp's details. This will NOT happen if the waypoint is a CUP landable (that is: the waypoint is marked as landable inside a CUP formatted file). Reason: no space for it on the screen.
Odometer distance will not be updated while circling, unless using Car-Bike-Trekking modes.
If not using metrics as altitude units, then use FL instead of aAlt in the bottombar.
Transparency for bottom bar and airspace drawing is available on all devices
Oracle is now much faster
Fix 604.plr and SZD 50 polars
$PTAS1 NMEA sentences parsing : baro altitude can be negative on low and with high atmospheric pressure
Since v5.0 COM port parity could not be changed by configuration, now fixed
In Windows CE, com port could hang sometimes, now fixed.
Various minor fixes and performance enhancements
LK works on some Kobo devices. With or without OTG kernel:
Kobo Mini
Kobo Glo
Kobo GloHD
Kobo Touch 2.0
Without OTG kernel:
Kobo Touch ( N905B and N905C Model only )
no other models are supported.
These devices do not have a GPS inside, so you need to provide a GPS feed through either a serial port or through WiFi.
Serial ports requires internal hardware modification, or the use of a USB OTG cable and a usb to serial adapter. In this case, a special version of LK is required too, in order to provide USB OTG kernel capability.
There is no sound in Kobo.
The grey-scale e-ink display has only 16 colors, and we cannot do miracles with dithered terrain rendering. However, we have tailored all colors for dithered greyscale on Kobo at the best possible result. The Kobo version is not a simple greyscale version of LK8000: it is custom made concerning colors.
Connect the Kobo to PC with a USB cable, so that it appears as a USB disk drive.
extract the content of kobo-install.zip archive into your Kobo ( use "kobo-install-otg.zip" if you want to connect a GPS source through USB )
Right click on file -> Extract To... -> choose "KOBOeReader" USB drive
If you have chosen to install the OTG version, then after restart on the startup screen you must see “- USB host kernel -”
Notice for MAC OS users, a tip: archive contains a “.kobo” hidden folder! You may not see the .kobo folder because on Apple any folder beginning with a dot is considered hidden. Under MacOS it is necessary to install one among many available tools to let you visualize hidden folders.
To exit LK and enter the Nickel environment, use the startup Kobo button on LK.
Otherwise, after a normal exit from LK, the Kobo will go to sleep.
connect the kobo to your computeur with usb cable
copy Map files in "LK8000/_Maps" folder ( get it from http://lk8000.it/download/maps.html )
copy Airspace files in "LK8000/_Airspaces" folder
copy Waypoint files in "LK8000/_Waypoints" folder
"Menu" -> "Config" -> "Config 1/3" -> "LK8000 Setup" -> "Device Setup"
configure Aircraft ( type polar, name, class, compID ... )
"Menu" -> "Config" -> "Config 1/3" -> "LK8000 Setup" -> "Aircraft Setup"
change your Name ( used by IGC logger )
"Menu" -> "Config" -> "Config 1/3" -> "LK8000 Setup" -> "Pilot Setup"
configure Map / Airspace / Waypoint
"Menu" -> "Config" -> "Config 1/3" -> "LK8000 Setup" -> "System Setup"
connect the kobo to your computeur with usb cable
your track log is inside "LK8000/_Logger" folder
Download the app “GPS2NET” or something similar from Play Store. This application is going to use the GPS inside the smartphone to transmit a gps feed over wifi.
From GPS2NET menu, select Settings, General, Start at boot OFF, GPS Interval 1 second.
Check that on the main GPS2NET page there is 6000 (the later port number).
On the smartphone enable Data Transmission, and enable Router WiFi
Important: you must be under 3G or 2G coverage to initially do the pairing with Kobo
From the Kobo welcome screen, choose Set up over Wi-Fi
Search for the smartphone in the network list, and select it. If the Router Wifi on smartphone has a password you must enter it.
The smartphone in this phase must be under 2G or 3G coverage to give Kobo an internet connection, otherwise the Kobo will disconnect immediately saying no pairing.
If the connection is established, in the pull down menu on the smartphone a new connected device will appear. Kobo is now connected to Android.
On Android GPS2NET click on START. From now on, the smartphone is sending the NMEA stream of the GPS on TCP/IP, to whatever network device connecting to the smartphone on port 6000. It will say “Waiting for connection”.
Switch off the Kobo with its hardware switch. Wait until it is off and then switch it on.
LK8000 will appear. Enter FLY mode.
Menu, Config 2/3, LK8000 Setup, Device Setup.
Device A: Generic
Port: TCPClient
IP: 192.168.43.1 Port: 6000
Exit configuration. On the screen, GPS: No ComPort initially.
After 30-60 seconds, GPS: NO VALID FIX or even better, already a valid fix, and the clock will start running. Your Kobo has a GPS!
Terminating LK8000 with Exit will shutdown Kobo and Wifi automatically. On the smartphone no devices are connected. Enter GPS2NET and click on STOP. You can switch off Router Wifi too.
Of course you don't need to do the pairing and the above procedure after the first time.
Here is what you need to do in order to restart Kobo using the old Wifi connection to android gps.
You don't need Data transmission enabled, and you don't need an internet connection after pairing kobo-android is done the first time
Enable Router Wifi
Run GP2NET and click on START
Switch ON the Kobo, LK8000 is starting, enter FLY mode
Initially Kobo is not yet connected to Android. On the screen you read
GPS: No ComPort . Wait for 30-60 seconds , and you get GPS: NO VALID FIX or a good fix with the clock running.
Now that Kobo as a GPS connection to android, do the following test.
Check LK8000, gps is running, either with NO VALID FIX or with a valid fix.
On Android, switch off Router Wifi and/or stop GPS2NET, and/or switch off the phone.
ON LK8000, GPS: No ComPort
Even with no 3G or 2G connection, switch on the Router and start GPS2NET.
After a while, LK8000 will get the GPS feed.
So in case of smartphone problems during flight, you dont have to do anything on Kobo, just fix the smartphone.
If the connection does not work, there is a chance that the local IP address of the smartphone is not 192.168.43.1 . To find the correct address, download from Play Store an app like OS Monitor .
From OS Monitor select Connections and browse the list until you see GPS2NET.
You should see something like 192.168.1.43:6000
Search for 6000, not for other ports. The address on the left is the correct IP address to use inside LK8000. This will not change any more, since it is stable inside your Android every time you switch on Router Wifi.
V4 and V5 come with LK preinstalled, and their custom piezo speaker and pressure sensor are fully supported!

Kobo devices have an e-ink screen which features only a limited number of grey shades.
For best result, it is a good idea to use textual pages in black over white.
In the example, you can notice the bottom bar is not black but white. To achieve this look, a few easy steps in configuration are needed.


Finally, since these eink screens have an higher resolution than PNAs, you may want to change the size of overlays, map items etc. to a more reasonable size.

Ullrich Heynen (alphalima@lk8000.it)
E.D.Klinkenberg
A modern transceiver can be externally controlled via its serial interface. This feature was originally thought to connect a second radio handling panel installed at a double seater backseat.
Now this feature is exploited by LK8000 to control the radio conviniently from within the program. It gives the possibility to change the most important radio parameters as frequency, volume, squelch and dual channel watch easily with some klicks on the touch screen.
The first LK8000 supported transceiver is the Dittel Avionics KRT2-transceiver, a wide spread device.
From a practical point of view an easily to use radio interface
(1) reduces the workload of the pilot significantly and
(2) promotes the willingness for radio contacts to enhance situational awareness.
To control the radio it needs a) a physical interface and b) a device driver.
Some devices (e.g. Vertica2) have a spare serial standard interface, a comfortable situation. In this case you can speak directly to the tranceiver in its "own language", by a special device driver.
If you are restricted to one physical serial port (typically PNAs) all external informations (GPS, E-vario, FLARM, radio) can be handled over this one port by the help of a special hardware multiplexer, developed by Ullrich Heynen and provided as an open hardware project with open source controller software to be found at github.
The technical details of the hardware connection are described in a separate document.
Attention!
Here is is assumed that you have a working hardware link, either directly or via the multiplexer.
LK8000 supports the direct link to the KRT2 with a special KRT2-driver and the link via the multiplexer by a generic NMEA-driver named "PVCOM".
For the direct link go to the device configuration page:
Menu ▶ Config ▶ Config 2/3 ▶ LK8000 Setup ▶ Device Setup
and choose Dittel KRT2 as device B at the appropriate com-port and baud rate (9600), see fig. 1.
Fig. 1: LK8000 device configuration page, device B configured to the native Dittel KRT2 driver bounded to com-port COM2 at 9600 baud, 8N1

In the case of the multiplexer link at the same configuration page
Menu ▶ Config ▶ Config 2/3 ▶ LK8000 Setup ▶ Device Setup
choose the PVCOM-driver as the device B, see fig. 2
Fig. 2: Configuration of device B configuration as radio with the radio-NMEA-PVCOM driver using the same com-port COM1 as Device A, the most reliable GPS-source (and other NMEA devices)

With the help of the terminal you can check the traffic on both ports.
There are several posibilities to control your radio from within LK8000.
(1) Access by the menu
(2) Acces by the waypoints chooser
(3) Acces by the surroundings page
Access by the menu:
With
Menu ▶ Config ▶ Setup Radio
you reach the radio config box, fig. 3:
Fig. 3: Radio-touchscreen interface
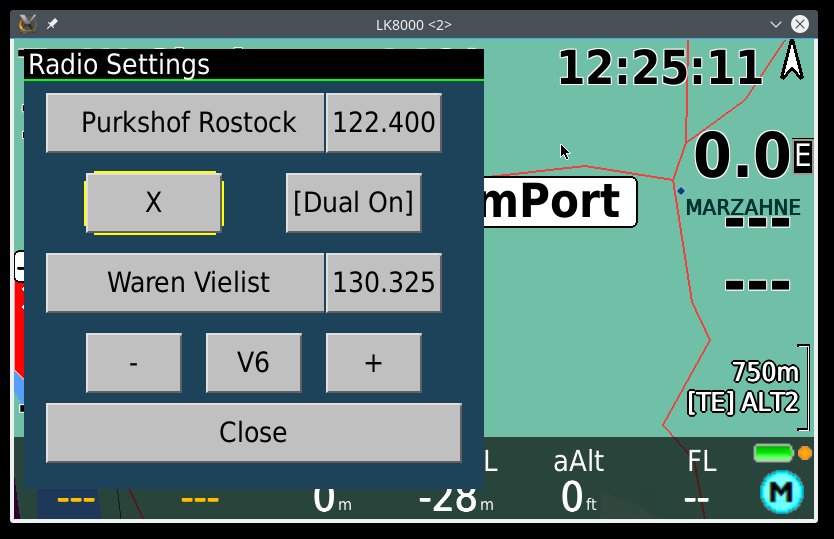
The interface is widely self-explantory:
The two current radio-channels with names and frequencies are shown with the active one on top.
The [X]-button exchanges the two channels.
The [Dual-On/Off]-button activates/deactivates the dual channel watch.
Volume or squelch changes are choosen by the [V/S]-button, the value itself can be changed by the [+] - or [-]-button and is indicated by the appended number to the [V/S]-button.
A channel of the two can be changed individually by either klick on the name field or the frequency field.
By clicking the name field you choose the name of the channel from the waypoint chooser, see fig. 4.
Fig. 4: Waypoint chooser

Choosing a waypoint, you can set the frequency by the [Output Frequency]-button, fig. 5.
Fig. 5: Frequency setting button

There is also the possibility to set the frequency within the radio interface by hand. It can be done by klicking on a frequency field and then you get a numerical input pad, see fig. 6.
Fig. 6: Numerical frequency input
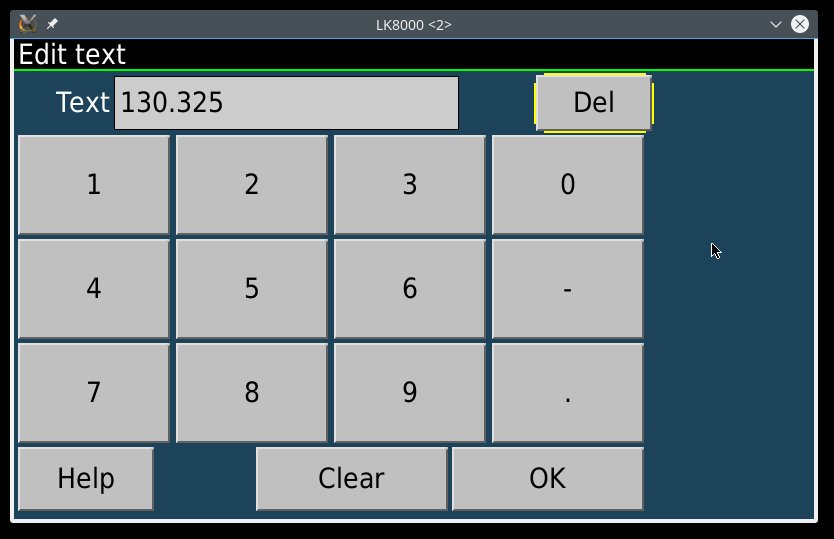
Here you choose the wanted frequency and if it is known from within your waypoint file, the name will be resolved and shown after klicking [OK].
The input mode of the numerical pad is somewhat smart and resolves also e.g.:
121.5 => 121.500MHz
129 => 129.000MHz
1225 => 122.500MHz
13115 => 131.150MHz
Access by the waypoints chooser:
Choose a waypoint as for navigational purposes and set the linked frequency, see fig. 5.
Acces by the surroundings page:
After a long klick on an interessting part of the map you get a list with all interessting things in your surrounding, fig. 7.
Fig. 7: Surroundings list

Choose an item with a frequency and select it. From the waypoint dialog you can set the frequency as described, see fig.5.
Note, if an airspace name here includes a valid frequency there will also be a radio frequency setting button in the airspace detail dialog!
 Fig.
8:
Airspace details with frequency button
Fig.
8:
Airspace details with frequency button
Index
Overview of the new LK8000 v6.0 2
Nimbus development system 3
Overlays configuration 5
Configurable Font sizes 6
Bottom bar size 7
VisualGlide size 7
Nearest pages font size 8
Info on two lines in Portrait mode nearest pages 8
New Menus 9
FAI optimizer start on leg / start on turnpoint 9
Glide computer 9
Airspaces 9
New infoboxes 9
Auto Zoom 9
Task system 10
Devices 10
Simulator 10
Terminal Com Port monitor 10
New terrain color schemes “LiteAlps” and “Low Hills” 11
Runtime parameters saved on exit 12
PC version screen resolution choice 12
PLUGIN FOR PARAGLIDING NO MORE NEEDED 12
Other changes 12
Fixes 13
KOBO SUPPORT 14
Installing LK on Kobo 14
Adding Maps, Airspaces, Waypoints on Kobo 15
Configure LK8000 software 15
Getting the track log (IGC recording of flight) 15
Feeding GPS signal to Kobo via WiFi on Android 15
Shutdown LK8000 and Wifi on Kobo 16
Normally restart LK8000 with Wifi 16
Smartphone disconnected from Kobo? 17
How to find the correct IP address of your smartphone Router Wifi 17
GoFly instruments 17
How to configure a Kobo for best visual results 18
LK8000 Radio Interface 19
LK8000 configuration 19
Controlling the radio from within LK8000 21
|
LK8000 Tactical Flight Computer version 6.0 – Changes from v5.0 |
|